Introduction: In this article – part of an ongoing “Introduction to Genealogy” series – Gena Philibert-Ortega gives tips on how to label your family photos so that future generations can know and appreciate them. Gena is a genealogist and author of the book “From the Family Kitchen.”
Maybe you’re like me and your family history includes hundreds of family photographs: photographs you inherited, photographs taken by your parents, photographs taken by you. (Don’t even get me started on those dozens of photographs taken in the 1970s at the zoo… each photograph spotlighting a specific out-of-focus animal.) So now that you have this massive collection of family photographs, what do you need to do?
One thing I worry about is what happens when I pass away. Not that I’m planning to anytime soon – but when I do, who will inherit these photographs? The best scenario is that my photos are inherited by an equally passionate family historian. But how happy will they be with hundreds of photos depicting people and events that they don’t recognize and aren’t sure are even relevant to their family history?
We need to take time today to ensure that our photo collections are preserved and ready for the next generations who inherit them. One way to do this is to clearly label our photographs so that others can understand who they depict, thus allowing them to know who these family members are.
How to Label
First, we need to label or caption our photographs by writing on the back of the photo. The best way to write on the backs of photographs is to use a #2 pencil. Like in your school days, the #2 pencil is preferred because it’s not too hard nor too soft. And more importantly it won’t leave an indentation in the photograph.
When labeling photos, what you don’t want to do is to use anything that will “indent” the photo as you are writing. Hard leaded pencils or ball point pens, for example will do this. On newer photographs that have been processed on coated papers, pencil won’t work so you’ll need to use a non-bleeding archival quality marker. These may look like felt tip markers, but the tip comes out of a metal shaft. These are found in quality crafts and hobby stores. “These are not water-based as felt tip markers are, and will not bleed through the photograph,” notes Gary Clark of PhotoTree.com.
Make sure to give the ink plenty of time to dry. Do not stack the photos on top of each other as soon as you are done writing or you run the risk of the wet ink smudging or transferring to the other photo/s in your stack.
What to Label
It may seem like an obvious question, but what information should you add to the back of a photograph? Names of the people pictured are a start, but what else? This question hit home with me as I looked at a caption my dad wrote on the back of a photo of my mom, my brother, and me showing off our fish catch in the late 1970s. In the caption he used his nickname for my mom and not her real name. I wondered: in 20-plus years, would my kids or their kids know who that was?
So, some things to keep in mind when adding information to a photograph:
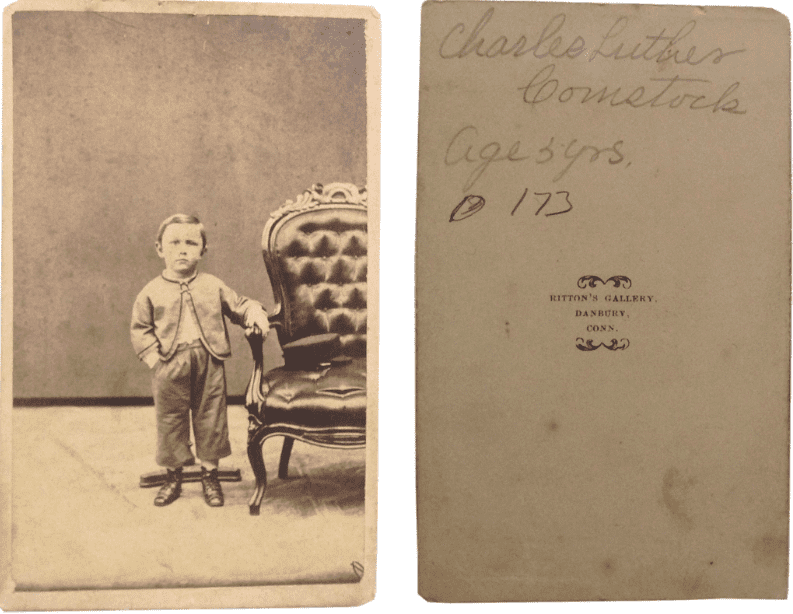
- Name: Spell out the person’s entire name. Writing only the first names does no good years from now if there are multiple people who share that name, or the inheritor of your photographs isn’t sure if that “Daniel” is a family member or a friend. If you use nicknames, also list the person’s given name. Today’s nicknames may be lost or unknown to others. And unfortunately, nicknames don’t always make sense in relation to the person’s given name – so they can render a person that should be known as unknown. Make sure to add a surname; this is especially important if multiple family members share a common first name. Don’t use relationship terms like “grandma” or “mom” since the reader of your caption has no idea who wrote the caption and whose mom that was. Photos labeled “Grandma Smith” do no one any good since all women who marry into your Smith family and have grandchildren would be known by that vague moniker.
- Place: Is that photo of your children in front of your house? List whose house it is and where it is located. Remember that in the future that house may not exist. If the photo was taken on a trip, write out where and when the photo was taken.
- Date: If a date or even a year or decade is known, identify it. Dates on photographs are important in establishing context for that person and better understanding their lives.
- Who/What Else Is in the Photo: Identifying the type and year of the car in the background, or the dog’s name, or the event the photo commemorates, can help provide the viewer with much-needed context.
Dos and Don’ts
You realize there are always some dos and don’ts when we are taking care of our family heirlooms, and photos are no exception. Here are a few tips to consider as you get ready to identify those family photographs.
Dos
Take time to label your photos now. You may believe you will remember everything about that photograph – but over time we forget dates, names of relatives we met once, and other details.
If you’re not sure about your older photos, consider enlisting other family members that can help. One way to do this is through a group email or posting the photos on Facebook and tagging family members that might be able to provide the missing information. The bonus to uploading mystery photos to Facebook is that those family members can now have access to photographs they don’t already have in their collection.
With group photos, make a “working” copy on a copy machine. You can write on the face of this copy identifying the subjects you know, and sharing it with others to help identify the ones you don’t know. Once the people are identified with confidence, then write the names on the back of the original photo, noting rows and position for each name.
Don’ts
It may be obvious to not use tape on your photos, but also keep Scotch tape (cellophane, clear, etc.) away from them because static electricity can sometimes attract them to the photo face – and ruin the photo.
Providing detail about a photograph on a separate piece of paper might seem like a good idea, but the paper can be separated from the photograph and not be available to future generations.
Label Those Photographs!
Labeling photographs is a great weekend project, or even something that could be done while enjoying your favorite TV show. Take some time to create a work area and label those photographs in small groups, then decide how they should be stored. After you label them it might be a good time to scan (both sides) and store them in archival safe boxes or albums. It can seem like a lot of work – but by putting in the time now, you ensure those memories will survive for years to come.
Note: Special thanks to Gary W. Clark of PhotoTree.com, who provided information for this article.
Related Articles:
If, in 2018, I label a photo taken in 1962, I think I should include a note such as: “Photo labeled in 2018 by Janet Smith.” Maybe even a further explanation, such as: “from personal recollection” or “as recalled by aunt, Sarah Wilson.” The whole thing becomes overwhelming to me.
Jan, yes, that method of labeling would provide future generations a nice provenance. But you’re right, that can easily feel overwhelming. You might consider setting some goals and priorities for such a project. For example, you could label 25 photos this month and choose the oldest photos to start with. By breaking the project down, it may not seem so overwhelming.
Thank you for your comments. Good luck! –Gena
These are good tips. I have a photo of my grandfather and his brother-in-law and I don’t know which is which, so if a photo is of two or more persons use the left to right naming rule if it is possible to associate a name with a person. Also, the address would help isolate photos of persons with the same name who live in different areas. A case in point would be, I have a family member in Illinois and I would know a photo of a person with the same name would not be from Alabama. If photo is of a birthday also date it instead of listing it as the person’s (for example) 60th birthday. I might add that an address of the person(s) in the the photo would help in returning photos lost in a storm. Lots of photos have been lost in storms such as the tornados that hit the midwest frequently. There is an organization that collects all of the found photos after the storm and tries to return them to the family which lost them.
https://weather.com/storms/tornado/news/volunteers-restore-moore-family-photographs-after-storm-20130529
Alvin,
Thank you so much for those tips and information. I appreciate it!–Gena
Unfortunately, this article contains one bit of bad advice. Any photo-scrapbooker will tell you to NEVER use a lead pencil on the back of photographs (the lead can leach through) – instead use a photo-safe pencil or photo-safe pen. These can be found in almost any hobby store.
Sandra,
In reviewing advice from photo archivists, most suggest a soft lead pencil for labeling photos. Hard lead should not be used because it can indent. However, there are special photo labeling pencils you can purchase from archival supply retailers.
Thanks for your suggestions.–Gena
Never write on the backs of photos… I can’t believe you would even suggest that ever.
The problem with not writing on the back of a photo is that if it is separated from the album or source with the information, that photo lacks identification. Unidentified photos are more likely to be thrown out, sold, or separated from the family. So photos should be identified on the back with the appropriate tool, like a soft lead pencil or a photo safe pencil.
I too wonder about “after I’m gone” how will we identify digital photos? How do we tag our digital photos so decades from now our ancestors know who we are?
That’s a good question Janis. You can use metadata to provide provenance and “label” a digital photograph. The problem is that if the person/s inheriting the photo don’t know to look for that metadata they won’t find it.
I’ve also seen where people have scanned the photo and saved 2 copies. One scanned image for display, the other with names “written” across the people in the photograph done with a software program.
This is a topic I believe we will further explore in an upcoming article.–Gena
I understand the desire for a #2 pencil. Would a small adhesive label from a copier (Avery label, for example) with the appropriate information and applied to the back of the photograph work?
Keith,
Archivists don’t recommend adhesive labels on photos because adhesive may damage the photo and it cannot be “undone.” However, you could buy special protective sleeves for your photos and then adhere the label to that sleeve. Now the problem, once again, is if the photograph gets separated from that sleeve then it will lack identification.
Thanks for your question. Gena
Useful information, thanks.
Thanks Marcia! I appreciate your reading the article and taking the time to comment.–Gena
Thank you for the eye-opener. You have inspired me to begin a new photo review project!
Great Sandra! I need to get to work on my photos as well! Good luck!–Gena
Most of the online information we already were inspired to do. We have had great success with Facebook “groups.” We started with 2 members of a large family who both had the same idea and we now have over 300 members and over 1000 photos. I have seen photos submitted that members have said they cried over because they miss a cousin who they played with years ago who is no longer with us. And some individuals that do not recognize themselves till they hear the wonderful stories from older cousins and realize their parents were so close back then. And the stunned grandchild who at 30 yrs old uploaded a photo of their child who is a near perfect image of a great grandma’s childhood photo that belonged to another family member. We are blessed with our family site and all the stores uncovered. Thank you for this article, I’m showing this to others.
Wonderful idea to use Facebook groups Dorita. I too, have benefited from posting photos on Facebook for family to see. It’s a great way to identify photos as well. I’ve uploaded the photo, tagged family members and then asked them questions about who is in the photo and when it was taken.
Thank you so much for sharing with us your successes. –Gena
I have a lot of “instant photos.” As a scrapbooker, I was advised to reprint the photos onto photo paper because the “glue” used on the originals can degrade the photo over time. Is that your recommendation, as well?
Thank you for the article.
Bernice, thank you so much for your kind words. Are you referring to Polaroid type photos? Those photos can fade over time so it would be a good idea to scan the photos you have.–Gena
Gena,
In the last comment Bernice mentions instant photos (as you suggest, probably referring to Polaroids) and you respond with the idea of scanning them. I suggest that people purchase a photo editing program such as Zoner Photo Studio or Corel Paint shop Pro Ultimate and scan ALL their photos. The first of these is a subscription model that comes with 20GB free online storage to back up your photos to. The other is a PC software only. Both sell for less than $100 and in my estimation are comparable with Photoshop for so much less. They both come with searchable cataloging capabilities that allow you to document whatever information you may want to include with each photo. No worries about further degredation of photo quality or loss of the descriptive information. And in fact, you can actually use the software to improve the quality of any photo that may need “fixing” including faded, low light, torn, cracked or other defects. Most people have printers that also function as scanners and can scan at 400dpi (my recommendation). Even old newspaper photos which are famous for fading can be included. Just remember when scanning a newspaper to use the de-screening feature of your scanner if it has one. Of course, once scanned, uploading photos to Facebook for others to see and add further identifying information is great as well.
I know I have mentioned a couple of photo programs here, but there are many others out there both free and paid for. Those worth their salt display the metadata along with each photo as it is viewed. These just happen to be two of my favorites. Just try to find a program that not only catalogs your photos but can also edit and fix defects as many old photos that have been handed down through the ages tend to have defects of one kind or another that can be eliminated with careful editing.
Larry,
Thanks so much for those recommendations. I appreciate it.–Gena
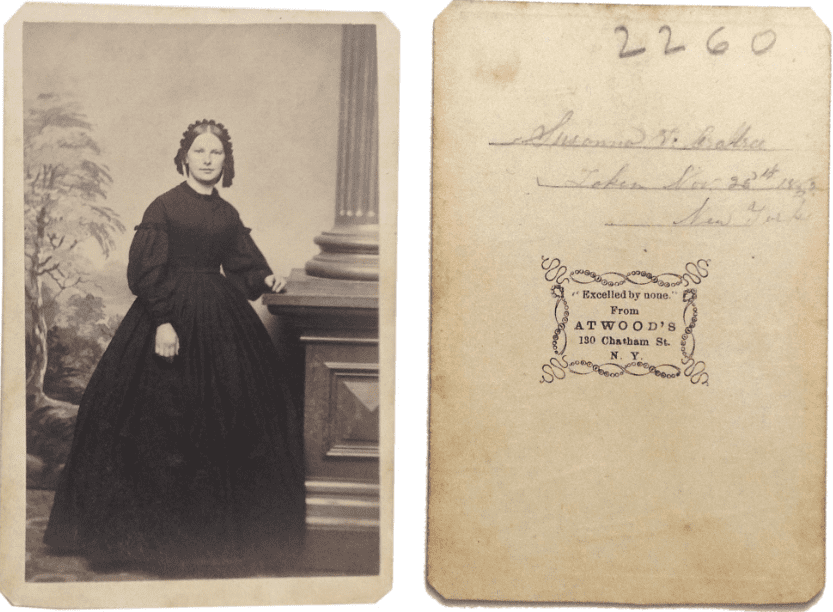
Thanks for these tips. I am having a hard time reading the year of the picture of the woman in the black dress standing with her arm resting on the pillar. I have a similar picture of an ancestor in a similar dress with the same hairstyle, and I’m trying to date it. Could you please read the year for me? Thank you.
Carol,
That photo is from 1862. Gary W Clark of PhotoTree.com includes it on his website. You can see it and other photos that are similar at http://www.phototree.com/gallery.asp?cat=hoop&f0=Hoop%20Dress .
Only use a Stabilo All pencil on backs of photos, it has a rather greasy feel, or like a colored pencil, but does not allow the writing to come through to the front like the pressure of a pencil does. I learned this many years ago when I was a Creative Memories Consultant. We taught this tip in our classes.
Also, I encourage people not to do fancy cutting on any vintage/antique photos. They should be left as they came. Scan them into your computer and then do editing to cut them, if you like.
I agree Pamela, that it’s best to not cut vintage photos. Preserving them is important. Cutting them does not preserve them.
In the old days, we made notes behind photo prints. With digital (and digitized) photos, we can use metadata. It’s not difficult, and the great thing is that it stays embedded in photos even when they are transferred across programs and computers. (Unfortunately, social media platforms, e.g., Facebook and Twitter, strip metadata.) In addition to helping retain the important details, metadata also makes photos instantaneously retrievable from a library of thousands of photos. Certainly a topic worth reading up on, and putting into use. A bit more on it in this article: https://medium.com/@appinitio/losing-track-of-your-photos-heres-how-image-metadata-can-help-3a5e9156715e; and technical details here: https://iptc.org/standards/photo-metadata/photo-metadata
Colin, thanks so much for sharing those resources. Hopefully, researchers get into the habit of looking at the metadata. It’s so important however, because it is “hidden” to a certain extent, some people may miss it entirely. –Gena
Dear Gena, Midwest Genealogy Center (Independence MO) shared this article on their Facebook page (2.22.2021) so I hope you will still get this inquiry. I’m in the middle of going through all my stored photos and labeling. Whew! I purchased LePen from a hobby store but wasn’t happy with it. As you mention, it smears, and on slick photo paper it doesn’t seem to dry very well. I’ve used Sharpies but they also take time to dry. I’ve been using a Flair felt-tip as my research said it was acid-free. So far, it has worked the best and I have not seen any bleeding through. If there is to be bleeding through, how long does that take to happen? Should I switch back to the LePen or Sharpie and just wait? Afraid I’m not very patient! I am scanning photos but not all of them, only ones with family members in them or ones with my immediate family with friends. While originally the photos were not labeled, they were still in the envelopes from the stores where they were developed and I did write the year and event on the envelopes so that’s helped a bunch! Thank you for this article.